Arduino Software PWM without library

Sometimes you want your code to be as independent as possible. Arduinos have a hardware PWM-function, but not on every pin. For instance, on the (awesome!) Seeedstudio Grove Beginner Kit, both onboard LEDs (pin 13 and 4) are on pins that don’t have hardware PWM. There is a library to do software PWM, but sometimes you don’t want to use a library (e.g. extra overhead).

Here is an example that simulates PWM using only Arduino native functions:

/*
Analog Input

Demonstrates analog input by reading an analog sensor on analog pin 0 and
turning on and off a light emitting diode(LED) connected to digital pin 13.
The amount of time the LED will be on and off depends on the value obtained
by analogRead().

The circuit:

  • potentiometer
    center pin of the potentiometer to the analog input 0
    one side pin (either one) to ground
    the other side pin to +5V
  • LED
    anode (long leg) attached to digital output 13
    cathode (short leg) attached to ground
  • Note: because most Arduinos have a built-in LED attached to pin 13 on the
    board, the LED is optional. created by David Cuartielles
    modified 30 Aug 2011
    By Tom Igoe This example code is in the public domain. http://www.arduino.cc/en/Tutorial/AnalogInput
    */

int sensorPin = A0; // select the input pin for the potentiometer
int ledPin = 4; // select the pin for the LED
float sensorValue = 0; // variable to store the value coming from the sensor

void setup() {
// declare the ledPin as an OUTPUT:
pinMode(ledPin, OUTPUT);

}

void loop() {
// read the value from the sensor:
sensorValue = analogRead(sensorPin);
// turn the ledPin on
digitalWrite(ledPin, HIGH);
// stop the program for microseconds:
delayMicroseconds(sensorValue);
// turn the ledPin off:
digitalWrite(ledPin, LOW);
// stop the program for for microseconds:
delayMicroseconds(1024-sensorValue);
}

3D-printable door handles

Materialise is an awesome 3D-printing service. In light of the COVID-crisis, they designed a suite of door handles that you could print and attach to doorhandles around your home or office, so people can open doors without touching them with their hands.

However, I found that none of their designs quite fit the most common door handles in use in The Netherlands. Also, one model tended to break easily because of the thin walls. So I adjusted their designs.

Best printed in PETG w/ 100% infill for sturdiest end results.

Clean HDMI output on Nikon D7000

Quick write-up of steps and info to get the D7000 to output clean 720p HDMI (no menus etc.) for recording or streaming.

You’ll have to download firmware version 1.03 which is available here (same site has a Windows download):

http://www.opendrivers.com/download/driver-166837.html

And put it through an online “patcher” here:

http://simeonpilgrim.com/nikon-patch/nikon-patch.html

Further instructions are available here:

https://nikonhacker.com/wiki/Nikon_Patch

2011 15″ MacBook Pro & Crucial M500 SSD issues

When a tool works, I like to keep it as long as possible. About 8 years ago, I bought a 15″ MacBook Pro, and it has served me well all this time. Apple replaced the logic board a few years ago (under warranty!) because of graphics issues. Since purchasing, it’s had it’s memory upgraded, the hard drive replaced for an SSD and the optical drive swapped out with a hard drive. I replaced the SSD again for a larger 512GB model (Crucial CT512MX100SSD1) when they became cheaper. So far so good.

Recently, a friend gave me a defective MBP, which turned out to be the exact same model (A1286). Great for spares, I thought. Lo and behold, there was a whopping 960GB SSD (A Crucial ct960m500ssd1) inside. “Why not swap that into mine?”

I wish I hadn’t. While the swap was relatively easy, and the computer worked okay, it got a little sluggish over time. I upgraded macOS and it got even slower. Until I got to a point where I couldn’t even send an e-mail without getting the hated macOS “Spinning Pinwheel Of Death” (SPOD). Once every 30 seconds. Sometimes Spotify would even stop playing music, even when I didn’t even touch the machine.

I’ve had this OS install since I bought it. All the development kits, homebrew, libusb-type hacks etc; maybe something is acting up. Let’s try a clean install. Nope, still getting beachballs right after booting a VM. Different SATA cable – nope. Other memory. Oh well.

Must be all the OS upgrades, I thought. Also, I’ve been asking quite a lot from such an old machine, running a lot of programs simultaneously – even some VM’s too. “But it always worked flawlessly!”. I was seriously considering buying a new laptop, even looking at Windows machines because of the price difference. A MacBook Pro with similar storage and memory would’ve cost ±€4000, though.

Then it hit me. The problems started – gradually – about a year ago. About the same time I upgraded to the M500 SSD. Swapped back the MX100, clean install; bingo! VMWare Fusion, running Windows 10 and Windows XP simultaneously, different browsers with 4K video, some file transfers running in the background; no problem.

Since I couldn’t find anything online about this apparent incompatibility, I thought I’d share it here. What makes it even more problematic is that the drive seems to work fine; the OS installs, it boots, etc. You’ll only notice the hangs and freezes after a while. That’s what makes this so insidious.

I don’t know the root cause of the problem, and at this point I don’t care. 512GB ought to be enough for anybody 😉

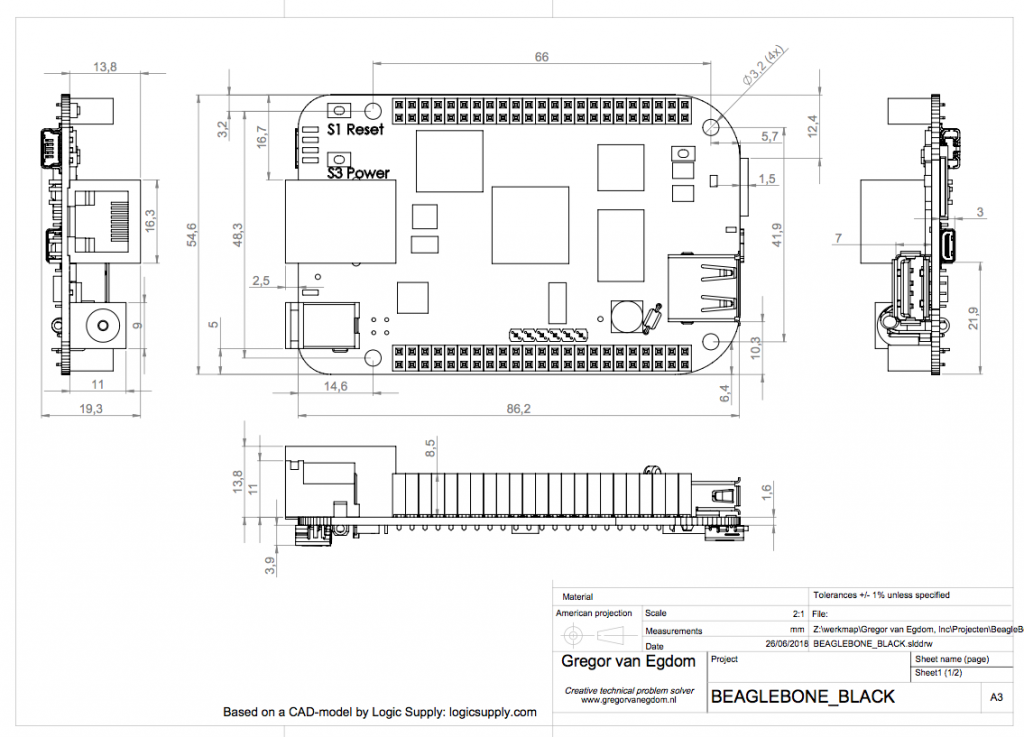
BeagleBone Black Technical Drawing

I know. You’re hacking and whipping a proof-of-concept up. You’d like to laser cut a baseplate for your favorite dev tool: the BeagleBone Black. Unfortunately, BeagleBone doesn’t provide nice technical drawings like Raspberry Pi does.

I noticed a shift in visitors to my blog; most of them used to come for the cheap chinese laser cutter pages, or the Solidworks Macros. But lately, most of them are coming for the Arduino Uno technical drawing! Since there are no good mechanical drawings for the BBB out there, I decided to whip one up.

Thanks for Logic Supply for the (very detailed!) CAD-model.


2011 15″ MacBook Pro WiFi cables breaking

If you have a 2011 MacBook Pro and are experiencing WiFi-connection issues, the antenna cables might be broken due to repeated opening and closing of the lid. Mine’s a A1286, but I guess other models have the same issue. Irritatingly, macOS shows “5 bars” of signal when in fact it’s getting none.

After doing some research, I found I wasn’t the only one with this problem.

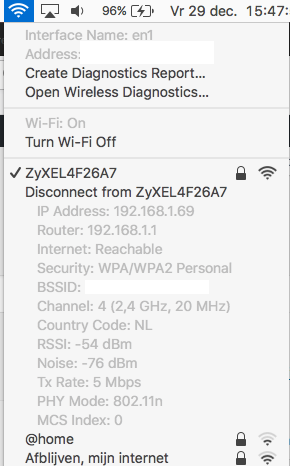
If you alt-click the WiFi-icon, you get this info screen:

Before replacing, both “RSSI” (signal strength) and “Noise” both were at -80dBm.


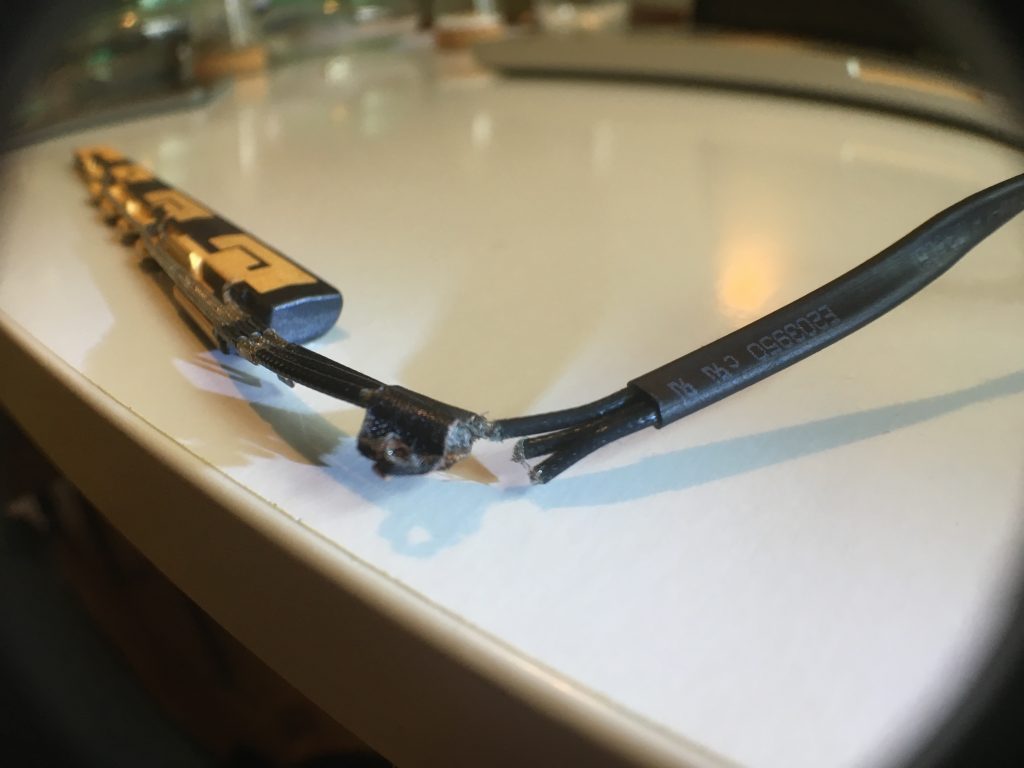
Here is the cable, you can clearly see the severed connections.

This could have easily been spotted in a durability-test of the hinge; maybe this only happens when the cables are twisted some way.

Come to think of it, Apple replaced my screen once due to glitches. Could be that the display cable had the same issue?

Why your Nexus 5 is stuck in boot loop

After tearing down and repairing the LG G3 I received someone’s broken Nexus 5, also known as LG D820. A part of the screen was shattered, but the digitizer still worked. It did, however, behave erratically. First I thought the digitizer was recording touches that weren’t there, but after disconnecting it, the problem persisted.
As it turned out, the power button was broken. Unlike the power button on my iPhone 4 – which didn’t respond at all – this button continuously registered presses when it was left alone. This makes the phone unusable because it will shut itself down, try to reboot, but before it can do anything thinks you’re trying to reset the thing.

The internet has dubbed this the “boot loop” and it’s a massive problem. Search for “lg boot loop” and you’ll get 4.3M results. “Nexus 5 boot loop” on YouTube yields 70K (!) videos. Probably not all of these boot loops are due to the power button; some reports suggest that some other connection on the main board degrades due to components heating up.

So what’s up with this particular instance? I fixed the phone by replacing the power button. When you can do this repair yourself, it will take about $1 and half an hour. I you go to a service company, they’ll probably charge $50+. As is so often the case, these tactile switches cost only a few cents but end up defining the (economic) lifetime of an expensive piece of hardware when they fail. I received 5 new buttons, so I decided to take one apart to try and understand what happened. Unfortunately, the original button was lost when I desoldered it.

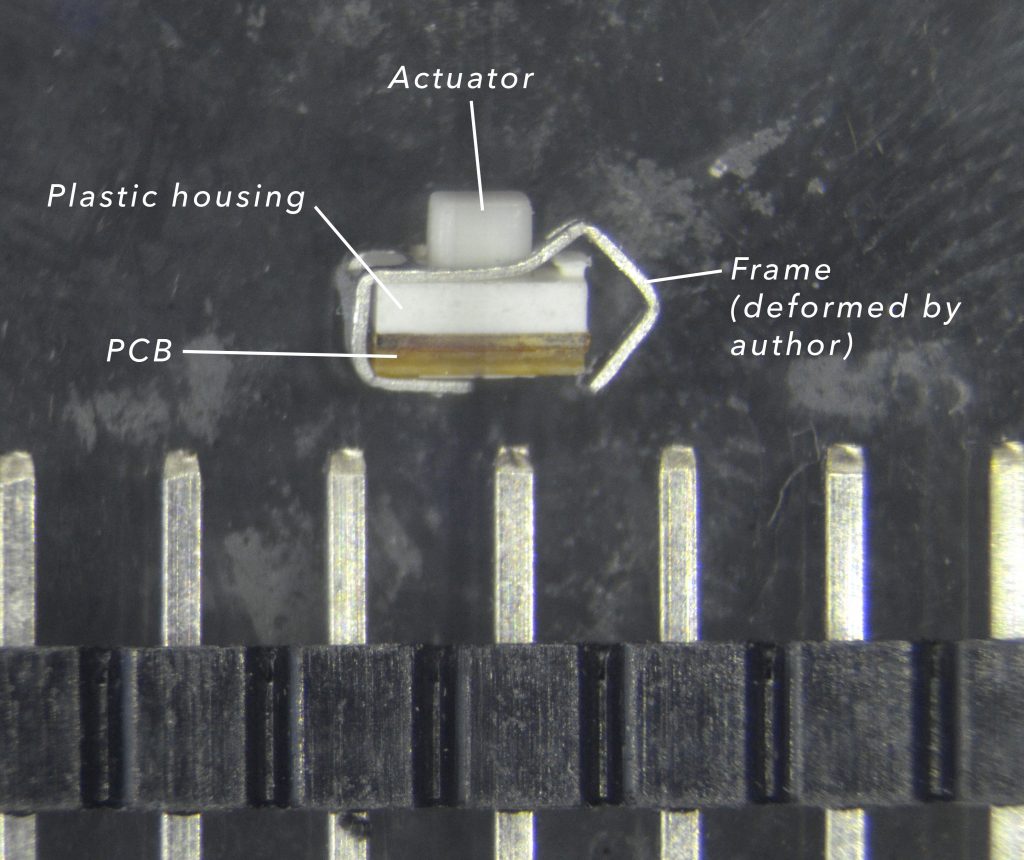
Side view of the switch. 2.54mm (100mil) pinheader for size reference.

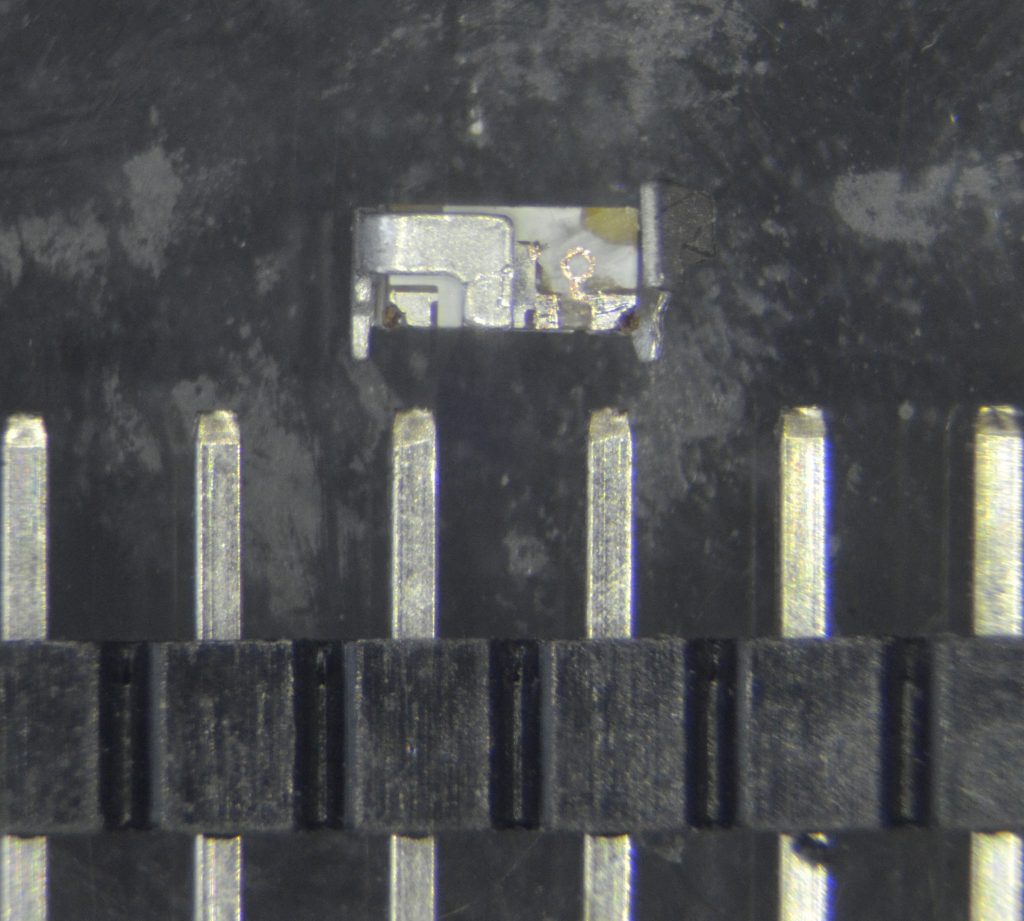
The same switch, flipped on its side. Left side is intact, on the right side the frame has been deformed and soldermask removed to expose the copper tracks.

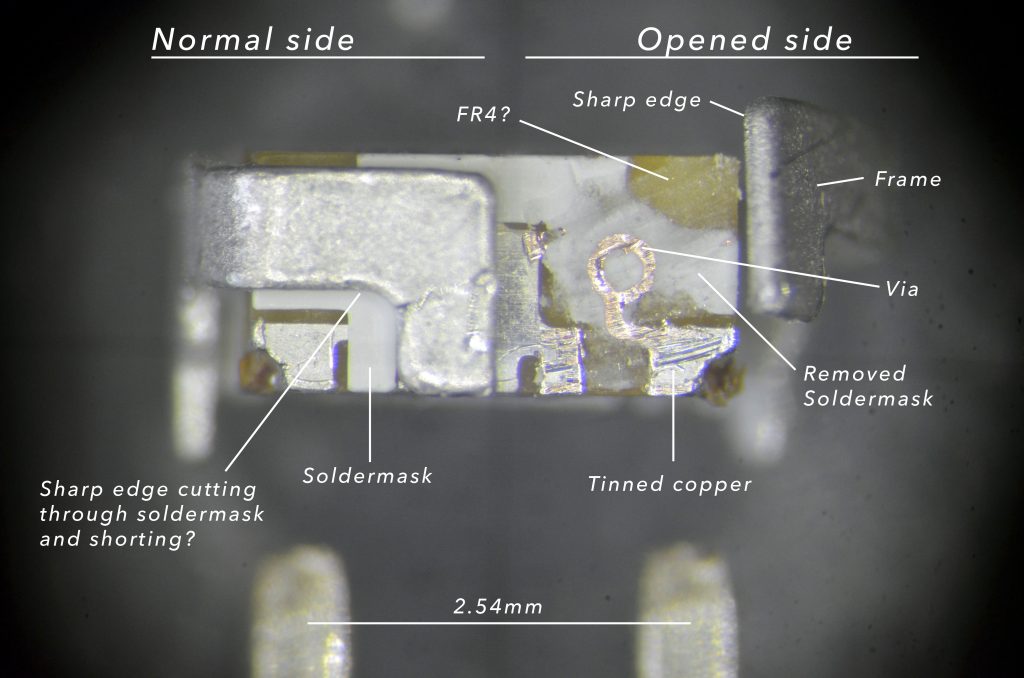
Same view, enhanced. Annotation shows which parts probably cause the malfunction.

Tinier problems.
First of all, this switch is tiny. Above is a microscope photo with a 2.54mm (100mil) header for size reference. When you make something electromechanical smaller, it becomes more error-prone. One thing that struck me immediately is that a big chunk of this switch is actually printed circuit board (PCB). The PCB and a plastic housing containing the switch disc is held together by a metal frame. The tin-coated copper tracks (metallic coloured) of the PCB are shielded against the metal frame by soldermask (white). The metal frame is stamped and still has the sharp edges associated with that process.

This is speculation, but I guess something like this is at the core of LG’s problems: Every time you press the power button of your phone, the soldermask of the PCB is pushed against these sharp edges. After a while, the mask will be worn away, and when it’s gone on both sides, the metal frame will short the contacts of the power button. Hence the erratic behaviour. The same short could also be caused by ingress of metallic dust. There are a lot of ways the design of this switch can cause problems, but I wouldn’t be surprised if this is it.

The never-ending quest for smaller consumer electronics prompted LG engineers to design or specify a switch with durability issues. It’s a shame that a valuable device like a smartphone is discarded prematurely because of a cheap part like a switch or headphone jack. I hope this helps someone diagnose their phone. Or maybe it helps fight LG in the class-action suit 🙂